AAPRCO Goes to GulfportI reached out to Private Varnish magazine to see if there was any interest in allowing me to post the article published in Issue 141 covering the trip to Gulfport, MS in the Meridian Speedway Library to compliment slideshow by Todd Stennis already on the site. The author, R J 'Bart" Barton, and AAPRCO/Private Varnish were very receptive and provided a digital file for me to use for this purpose - the below page has been created and added to the library:  Chris
0 Comments
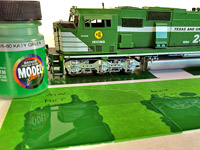 My earlier purchase of most of the Model Flex green paints available at Discount Model Trains confirmed what I had suspected, that the Katy Green would be the best starting point to begin the matching process. Painted swatches from all of the greens revealed that ALL of them were darker than the green on my Floquil painted locomotives. This meant that the first strategy would be to introduce metered amounts of white to the closest color--Katy Green. I would use a clear plastic paint dropper to add the drops of white paint. 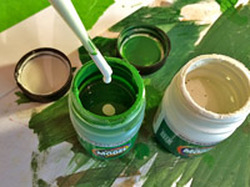 I found a sheet of Evergreen Styrene Plastic to use as my test bed to create color swatches. Using masking tape in a grid pattern each color swatch had a roughly equal area on the Styrene sheet. The first four test swatches had 3, 9, 18, and 27 drops of white added respectively. These were all very dark and had little visible variance. The next four test swatches had 41, 50, 60, and 70 drops of white added respectively. The color pattern was moving in the right direction but was not quite where it needed to be. The final four swatches had 85, 100, 115, and 130 drops of white added with the 130 swatch being very close to the green on T&GN SD60M 2493 used as the control in this process. 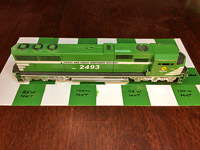 Given that each swatch painted depleted some of the green from the bottle, changing the drop/bottle ratio as white is added I suspect that an initial application of 150 drops of white paint to a new/full bottle of Katy Green paint will yield the correct color. 150 drops is right at 7 ml of fluid so the new formula for TGN/NTO green is 7 ml of Model Flex 16-02 Reefer White added to 1 oz (30 ml) bottle of Model Flex16-80 Katy Green. Now I need to master painting with this new paint. The challenge with the quick drying paint is to keep it from drying in the airbrush before painting of a model is complete! We will see... Model Flex Paint MatchingChris
Athearn Genesis GP7 Handrails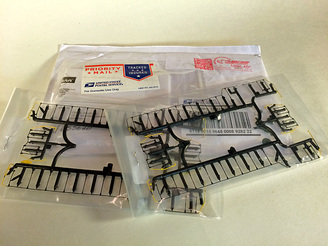 The plastic handrails that came with the Athearn Genesis GP7u models I am using to model my Y&MV 200 and Y&MV 201 are, of course, bright yellow. Unlike the paintable surface of the rest of the models, getting paint to stick long-term to the slick, flexible plastic handrails can be problematic. Yes there are racing car paints and paint flex additives, however, flaking yellow handrails on a black locomotive are not what I want to have to worry about patching up every time these units make an appearance over the next 20 years or so. To eliminate that issue with these locomotives I ordered two complete sets of black molded GP7 handrails from the Athearn parts department. Interestingly enough, they came with the ends painted yellow...some of which was flaking. This will be an easy fix to flake and paint white. These handrail sets arrived in the mail today. 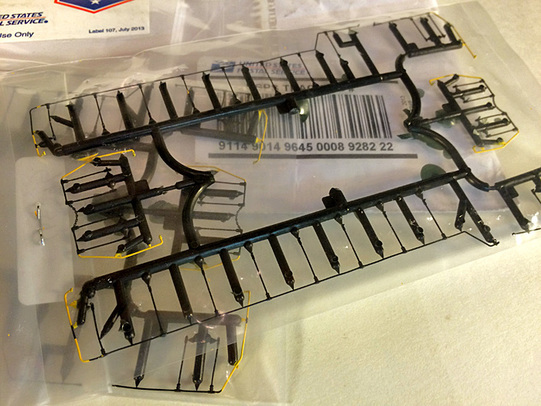 Chris
CR 230730 and CAGY 19116 Delivered 4-13-15Intrigued by the existence of former Pennsylvania Railroad Class X58 50' Boxcars in 1996, reincarnated as Conrail X58B class Boxcars, I decided I could justify having one of Tangent Scale Models newest releases in the Meridian Speedway fleet. So I did order their model of Conrail X58B 230730 from MB Klein. While perusing the on-line store I noticed that there was only one left of the Athearn Columbus & Greenville boxcars--No. 19116. No choice there, I had to pick that one up! Chris
A new slideshow has been added to my Meridian Speedway website. Todd Stennis has shared some photos he took last year while riding the AAPRCO special between Monroe, LA and Meridian, MS...  Chris
Removing Athearn Genesis GP7u Truck Side FramesPainted wheels are often overlooked by modelers when superdetailing locomotives. Back in the day of Athearn Blue-Box kits, truck side frame removal was pretty simple. As model locomotives have become more complex, so has this seemingly simple process. 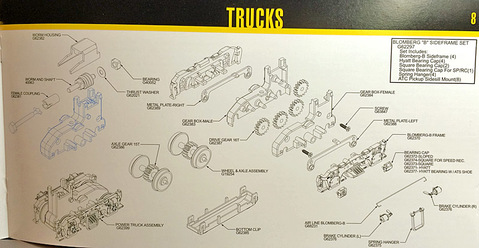 Though not a "must", painted wheels add one more level of realism to the appearance of the final product. With regards to the two Athearn Genesis GP7u locomotives I am converting to Y&MV 200, and Y&MV 201, the truck side frames have to come off as they are silver and need to be painted black. If it were not for the color issue, I probably would not have made the effort to remove the side frames to paint the wheels.
Coincidentally, my Atlas Y&MV SD35 552 did not have the wheels painted so I performed that task along with the 200 and 201. The Atlas trucks are a bit easier to deconstruct than the Athearn Genesis trucks. Though they are fundamentally the same style, the tabs on the Athearn Genesis units are a bit more difficult to access. Also the brass contact strips in the Athearn Genesis truck side frames are locked in place as the plastic tabs are melted, essentially riveting them in place. This means that even when the truck side frames are separated from the truck assembly, there is still a wire keeping the side frames attached to the model. Upon first inspection, it was not evident exactly how the truck side frames were attached. I researched the exploded parts diagram provided by Athearn Genesis to determine that the trucks were essentially connected like on Atlas units. This means that the underside of the gearbox is a removable "drip pan" attached with four tabs. These tabs are between the back side of the wheels and the outside of the gearbox so there is little room to maneuver. Athearn Genesis did provide holes in the metal locomotive frame that allow a small flathead screwdriver to pass through and access the top of the outer tabs. When the trucks are turned as far as then can freely rotate, this hole aligns on a tangent pathway leading to the tabs inside the wheels. From here it is simply a careful process of prying tabs on the drip pan over the nubs on the gearbox to free the bottom pan. Once the first two are free, the remainder of the tabs come off easier. Care must be made to handle the model cautiously as there are many detail pieces that can be easily damaged during this process. Once the drip pan has been removed, the model must remain upside-down to prevent the wheel assemblies and gears from falling out. With the drip pan removed and the model upside down, the truck side frames can be pulled out of the gearbox. As soon as the side frames are removed, the bottom drip pan needs to be snapped back in place to keep the contents in place and keep dirt and foreign objects out. I considered cutting the wires to paint the truck sideframes and then soldering them back, but I think it will be easier to mask the model with the truck sideframes exposed for spray painting. With the truck sideframes now removed from the truck assemblies, the wheels are exposed and ready for painting. I still have a bottle of Floquil Rust which I simply brush on, being careful not to paint the axle ends which are needed to conduct electricity to the brass strips in the truck sideframes. I also am careful not to paint the flanges or the treads of the wheels, however, paint here can be cleaned up easily with the locomotive under power on rails covered with an alcohol or paint thinner coated paper towel. Look for truck painting and re-assembly in the next update! One of Jacob's first train photographs....My 10-year-old son Jacob accompanied me on the mission to photograph Amtrak Heritage unit 156 last Sunday. I handed him my 20D and told him to snap away. I had not looked at his images until I just downloaded them to clear the card in the camera. Much to my surprise and delight several of the photos are very good. I have posted my favorite one here to share. We followed BNSF Culbertson, NE to Beaumont, TX grain train G-CULBNT9-25 from Metro to Lambert, stopping a few times to get the shot. One stop was at Main Street in Ponder to try a new angle. I have always wanted to incorporate this quaint downtown in a railroad photograph. The shot my son took is not the angle I went for...and I should have. Well done, Jacob!  Clicking on the image will take you to a larger file posted on RailRoad Picture Archives.net.
Chris Consist completed!The third and final unit of my latest locomotive consist sent to BradleyDCC has been completed. Athearn Genesis GP49 NS 4604 now has a LokSound decoder complete with the Nathan P5 horn sound. The headlights have been upgraded to LED's and front and real LED ditch lights have been installed. Below is the link to the BradleyDCC builder's video showcasing the locomotive consist! The consist - Athearn Genesis NS GP50 7022, Athearn Genesis NS GP49 4604, and Atlas NT&O B40-8 908. These units will be seen operating on model railroads on YouTube in the near future.  Chris
|
Categories
All
Author:
|
 RSS Feed


Proudly powered by Weebly
- - - Homepage of the Natchez Trace and Orient Railway and Texas and Great Northern Railway - HO Scale Meridian Speedway - Created by Christopher M. Palmieri - - -
© Christopher M. Palmieri - 1st Publish 12-10-2014
© Christopher M. Palmieri - 1st Publish 12-10-2014