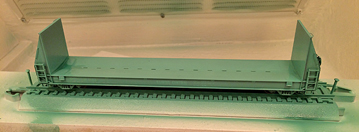
Air Tank Upgrade, Compressor Failure, and First PaintLast Friday, yes...Friday the 13th, was a busy day for Meridian Speedway Paint Shop progress! The morning began with a trip to Home Depot for a few components to upgrade my air tank, followed by the disappointment of the failure of my compressor to start up. That evening Joe Bohannon of the Chinook Lines and his wife came over for dinner. He quickly found the issue with my compressor and fixed it. He also brought a few locomotive shells, his own paint experiment, and his airbrush. All of this led to an impromptu test-run of the new paint booth!  The air intake valve that I have used on my air tank will work with any hose fitting that will air-up a car tire. I have had this tank for over 20 years and it was designed to take to the corner gas station and fill with air. Moving forward, I never have made adjustments to the original plumbing (built by Lenny DiMartino), not even after I purchased a large air compressor over 15 years ago. This meant that as the tank ran out of air I had to stop the painting process and manually refill the air tank. Considering the time invested in this paint booth project to the end of a better painting process and higher quality painted models, I decided now was the time to fix this. I was hopeful that there would be quick-connect appliances that would fit right onto the current threaded intake pipe, however, I was not to be so lucky! Instead I decided that the best route would be to install a quick connect valve between the tank and the existing piping, allowing two methods for filling the tank with air. The below slideshow hi-lights the modifications to the air tank.  Modification complete, I was now ready to break-in the paint booth with a test run...or so I thought! I had the window exhaust panel in place and connected to the paint booth. The air tank hooked up to my airbrush via a new hose (the old one desperately needed to be replaced), and I had hooked up the compressor to the air tank. I was excited by this arrangement as the compressor hose is long enough to allow the very noisy compressor to remain in the garage while connecting to the air tank several rooms away. Then I plugged in the compressor, flipped the power switch, and...nothing! My trusty compressor of many, many years decided to pick this moment to not start! I was displeased. To YouTube I went to research this issue and figured it was probably the starter switch.  Coincidentally fellow DFW area model railroader Joe Bohannon had reached out to me on this day to see if there were any opportunities to do any model railroading. I explained to him my task for the day and my obstacles. By the end of the conversation a plan was in place and we had company lined up for dinner. Joe and San Antonio area modeler Anthony Lorch had already collaborated on the issue of the disappearing brands of paint facing the hobby and are experimenting with a creative solution. Joe has some unique colors for the locomotives of his Proto-Freelanced "Chinook Lines". Most notably is a difficult to describe gray/blue/green...ish color that he got from a German military color pallet. He thought I might be interested in this as the greens for my T&GN and NT&O locomotives were victims of Testors' genocide of the Floquil line of paint and are no longer available. Joe, with a clear head, quickly honed in on the issue with my compressor, a power wire had come off the connection under the starter switch cover. The fix was very simple...and we had air! Joe did bring his own compressor and airbrush along with a quart of acrylic enamel paint from Sherwin Williams to test. The quart, matched to his model paint using Sherwin Williams' "Spectrometer", cost $22. The quart of course yields 32 ounces. Considering that most model paints are sold in the range of $3 to $6 per ounce, the cost savings is worthy of notice. After dinner, it was time to paint. I decided that the Chinook Lines color would make a good primer so I grabbed a Walthers 50' Seico Pulpwood Flatcar from my repaint stock, removed the couplers, installed shop trucks, and we were set. Unfortunately I guess I failed to properly clean my airbrush after the last use and an unexpected blast of air went into the paint bottle, instantly adding a neat gray/blue/green...ish explosion pattern to the inside of the paint booth. It was christened properly! Deciding to deal with that later, we substituted Joe's double-action paint brush and we were spraying. A few test sprays were in order and the paint/water mixture was adjusted. The below slide show shows the the painting of the pulpwood car as well as one of Joe's GP7 shells. So I was definitely out of my comfort zone here. I have never before sprayed with a double-action airbrush, never before airbrushed a water-based paint, and of course the painting environment was new. The paint booth worked like a charm! No explosions, no fire, and excellent ventilation. The ultimate test came from Joe's wife who declared that she could not smell paint in the house.
I must admit I was a bit skeptical about using house paint on a model. The result of this test has my attention! The finish was remarkably smooth and thin. I think that once I get comfortable with the properties of this paint there are excellent results to be had. Many thanks to Joe Bohannon for his assistance! Now to get this airbrush cleaned out... Chris
0 Comments
Your comment will be posted after it is approved.
Leave a Reply. |
Categories
All
Author:
|
Proudly powered by Weebly
- - - Homepage of the Natchez Trace and Orient Railway and Texas and Great Northern Railway - HO Scale Meridian Speedway - Created by Christopher M. Palmieri - - -
© Christopher M. Palmieri - 1st Publish 12-10-2014
© Christopher M. Palmieri - 1st Publish 12-10-2014
 RSS Feed


